Equipment & Resource List
I have an earlier in life background in sound recording and professional studio photography. My studio set up is not for the beginner, this is for somebody looking to create a professional broadcast studio to deliver on top quality content.
The following list includes links that support my amazon affiliate program. It is incredibly helpful if you purchase these items using these links. Thank you in advance. 🙏

Broadcasting
Studio Equipment

CAMERA:
This camera set up works well for streaming, Zoom, and content recording both in studio and on location. I have previously used higher quality camera / lens combinations, but downgraded to the $1000 class for function and ease of use. This is a perfect set up for somebody wanting something far better than a “webcam” and will not work to collect sound, you will need a separate microphone for your audio. (see my audio set up below).
Sony EV-10 - The 4k camera I use with an interchangeable lens.
Sigma 35mm 1.4 Prime Lens - I use this lens as the wide aperture creates a nice soft background.
Micro HDMI to HDMI Cable - To connect camera to Capture Card / computer.
HDMI to USB-C - Capture Card - (to convert Video stream to Data Stream Input).
Power Adapter for Sony Ev-10 - to plug directly into outlet.
Tripod - Manfroto like this one for sturdiness.
LIGHTING:
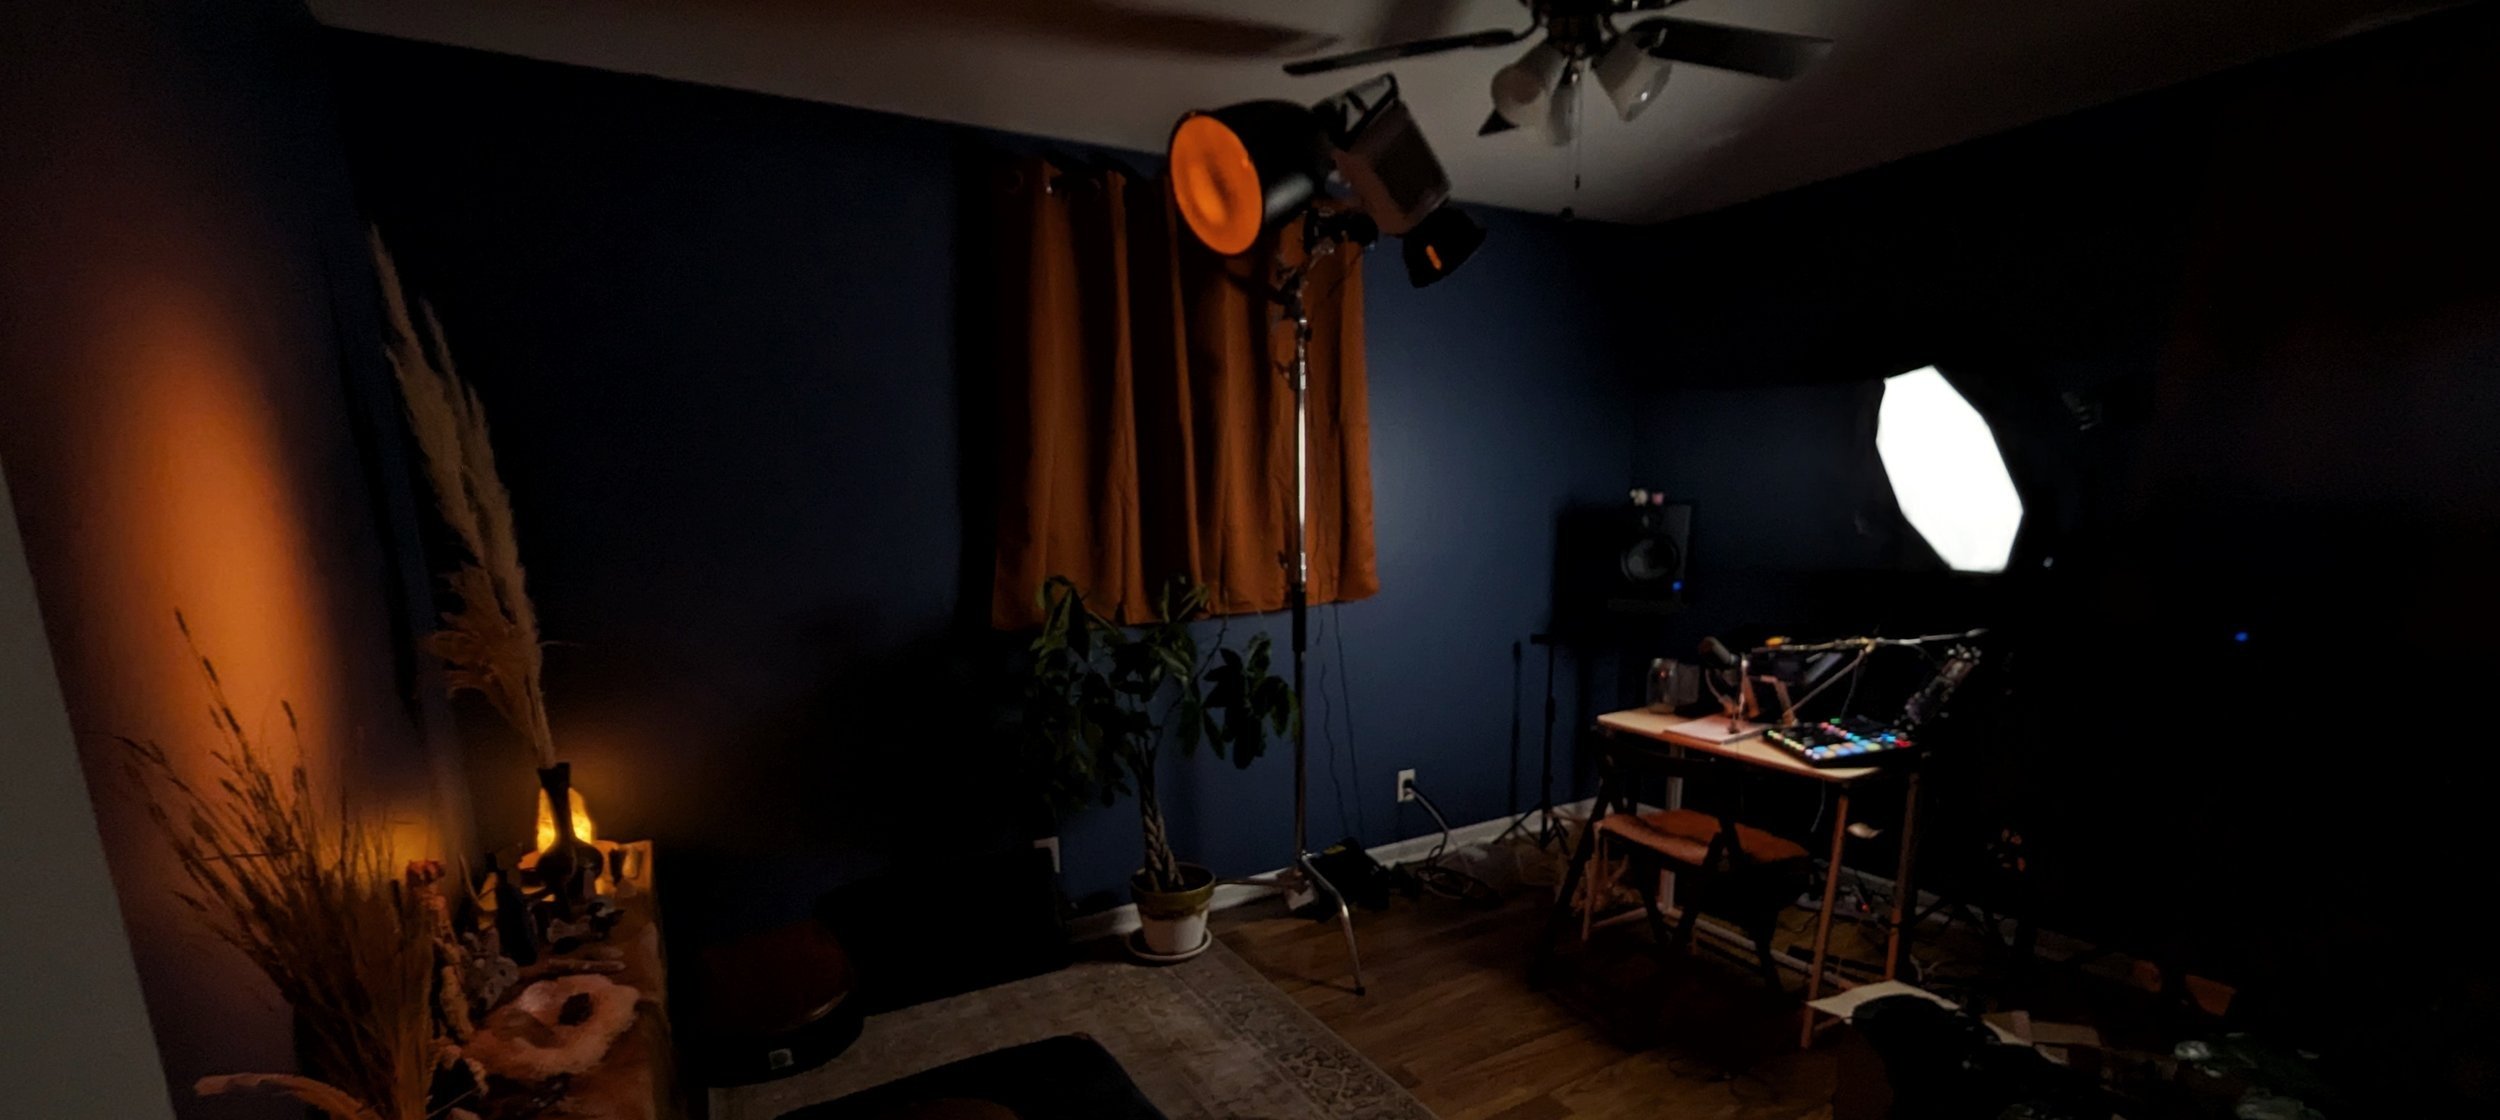
Disclaimer: This is the equipment in my fully professional-grade broadcast studio set up. This is not for somebody seeking a cheap home office set up. I use 3 lights. One is for my face with an octagon soft box, one shoots down from just behind me and 4 feet above and illuminates my hair and shoulders for background separation (this light is toned warm orange), and a third light casts a controlled beam of light onto the wall behind me creating a bit of a warm halo effect. The wall is deep blue. I am sharing this so that you are aware of the technical depth of this lighting set up. For a beginner you could start with just the “Front Face” light and modifier (modifier is what is placed on the light ie: softbox, grid, diffuser).
Front Face Illumination Light:
Light that faces toward my hair and shoulders - Wescott 55 degree with grid.
Back Lights:
I use 2 Godox Litemons LA 150R.
Light that faces my back wall has a Westcott 45 degree deep focus with Grid - This is what creates that beautiful and calm halo glow behind me in all my videos.
Both back room lights are mounted to a single very well counterweighted C-Stand, with accessories for second light. Important Note: A C-Stand is a professional tool for media, without proper counter weights (sandbags) this is a dangerous and very heavy item to have in a home studio. Only use a C-Stand if you do your research and understand counter weighting. I have 1 sand bag on the boom arm, and 3 bags on the base of the stand. The linked bags come empty and I bought sand at Lowes to fill them.
AUDIO EQUIPMENT:
I have a Mic, that runs through a mixing board. I do not use USB mic’s, they’re cheap. I have music from an IPAD that also runs through that mixing board. The board then pipes into my computer. My mixing board is specific for production and broadcasting. There are a lot of specific factors that go into these pieces and for many this is overkill, but for me this serves my needs in broadcasting and video recording. Furthermore, I use a boom mic stand that slides in just below view rather than one of those bulky desktop stands. I don’t need or want my MIC visable and I also need it to swing in above my mixing board. Look up desktop Mic Stand and select one that works for your needs.
Microphone: Shure SM7B - This is the standard for professional podcasting.
Stand that allows it to swing in front of my computer with least visual impact.
Mixing Board: Rode Rodecaster Pro 2.
Music: Apple Ipad Mini, smaller version.
Headphones: I use wired Shure professional in ear monitors, mine are the higher end SE 535 - $450, you can also find a cheaper version The SE 215 - $99 bucks.
*** If you are curious about the settings I use to maximize audio sound for broadcast, my suggestion is watching Mike Russels Video on his Rodecaster Audio settings to get set up.
COMPUTER AND SOFTWARE:
I have a Mic, that runs through a mixing board. I do not use USB mic’s, they’re cheap. I have music from an IPAD that also runs through that mixing board. The board then pipes into my computer. My mixing board is specific for production and broadcasting. There are a lot of specific factors that go into these pieces and for many this is overkill, but for me this serves my needs in broadcasting and video recording. Furthermore, I use a boom mic stand that slides in just below view rather than one of those bulky desktop stands. I don’t need or want my MIC visable and I also need it to swing in above my mixing board. Look up desktop Mic Stand and select one that works for your needs.
I use a Macbook Pro 16 inch for all Zoom Calls, Audio and Video Editing.
I use OBS Software to record Video and Audio.